How to DIY Feather Hair Extensions Like a Pro
Express Your Style with DIY Feather Hair Extensions
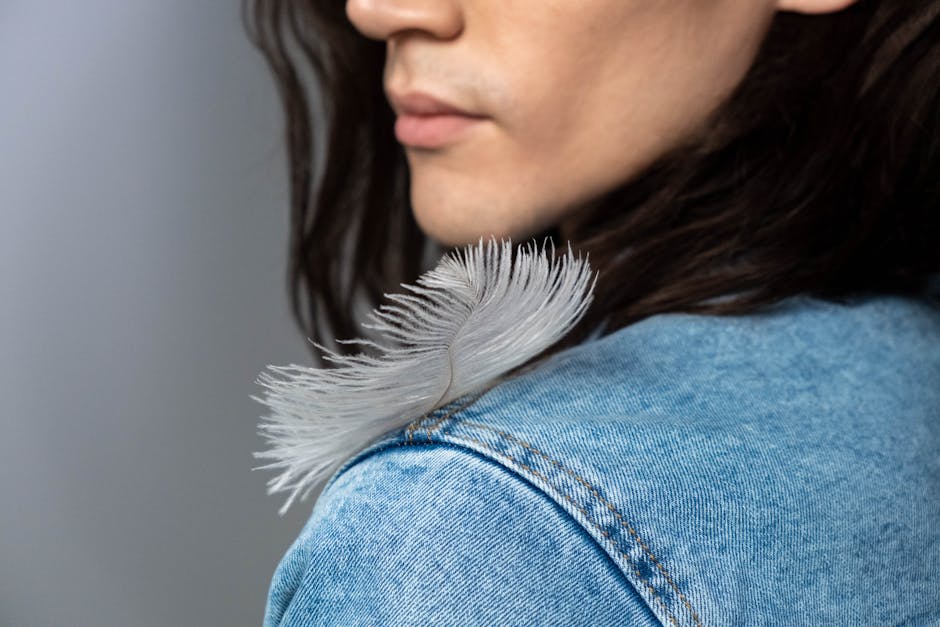
DIY feather hair extensions offer a simple way to add color and flair to your hair without salon prices. Here's how to get started:
- Materials needed: Feathers, silicone-lined micro beads, pliers, and a pulling tool
- Basic installation: Section hair, thread hair through bead using loop tool, add feathers, crimp bead closed
- Removal: Use pliers to uncrimp bead when ready to change or remove
Feather hair extensions have made a major comeback in recent years, offering a perfect blend of bohemian style and personal expression. The best part? You don't need to spend $50+ at a salon when you can create professional-looking extensions at home for under $20.
These versatile accessories can last 4-6 weeks or more with proper care, and yes, you can wash, curl, and even flat iron them just like your natural hair! Whether you're preparing for a music festival, adding subtle color to your everyday look, or planning a fun craft activity with friends, DIY feather extensions are surprisingly simple to master.
"It's so easy and so much less expensive than getting it done in a salon," notes one DIY enthusiast who installed her own extensions. The process takes less than 10 minutes per extension once you get the hang of it.
At Moonlight Feather, we've seen everyone from festival-goers to brides incorporate these natural accents into their hairstyles. The best feathers for extensions typically come from rooster saddle or hackle feathers, which are available in lengths from 3 to 7 inches and countless colors.
Ready to transform your look? Let's explore the complete guide to creating salon-quality feather extensions at home.

Feather Basics: Types, Benefits & Ethical Sourcing
Let's talk feathers! Before you dive into creating your own gorgeous hair accents, it helps to understand what makes certain feathers perfect for this purpose. Think of it as getting to know your art supplies before creating a masterpiece.
At Moonlight Feather, we've found these feather types work beautifully for hair extensions:
- Rooster saddle feathers: These come from the sides of roosters and have this amazing flexible, tapered shape that blends so naturally with your hair
- Grizzly hackle feathers: These neck feathers feature natural striped patterns that add incredible texture and dimension to your look
- Peacock eye feathers: Though shorter, these make stunning accent pieces when paired with longer feathers

Quality matters tremendously when selecting feathers. For DIY feather hair extensions, we always recommend fly-tying grade feathers. These are specially prepared to be durable, clean, and consistent—exactly what you want next to your scalp! Those cute craft store feathers might look tempting, but they're often lower quality and pre-dyed in ways that don't hold up in hair.
When shopping, you'll notice options to buy in bulk or smaller packs. Planning a crafting party with friends? Bulk purchases give you better value. Just wanting to try the trend for yourself? Our smaller packs are perfect for beginners and let you experiment without commitment.
Why Feather Hair Extensions Are So Popular
There's good reason these natural accents have maintained their popularity year after year!
They're incredibly lightweight and comfortable—unlike some hair extensions that can feel heavy or cause tension. Feathers add virtually no weight, making them comfortable even for all-day wear.
One of the best things about feather extensions? Depending on the type of feather, you can treat them just like your natural hair! Wash, blow-dry, curl, and straighten them (up to 400°F) without worry. This heat-friendly versatility makes them blend seamlessly with your regular styling routine.
The festival and bohemian aesthetics of feathers perfectly capture that free-spirited vibe so many of us love. Whether you're heading to a music festival or just want to add a touch of nature-inspired flair to your everyday look, feathers deliver that perfect boho touch.
The cost savings are pretty significant too. While salons might charge $30-$60 for just a few feather extensions, a DIY feather hair extension kit from us provides enough materials for 5-10 people for under $20. That's a whole crafting party for the price of one salon visit!
With a lifespan of 4-6 weeks, these extensions hit that sweet spot between commitment and changeability. Long enough to enjoy, but not so permanent that you can't switch things up with the seasons or your mood.
Choosing the Best Feathers for Your Look
Finding your perfect feather match is all about considering a few key factors:
Length matters! Feathers typically range from 3-7 inches, and your hair length should guide your choice. If you have short, chin-length hair, stick with 3-4 inch feathers for proportion. Medium, shoulder-length hair pairs beautifully with 4-6 inch feathers. And if you're blessed with long locks, 5-7 inch feathers will complement your length perfectly.
Texture is another important consideration. Feathers come in everything from sleek and smooth to fluffy and textured. Those smoother varieties tend to blend more seamlessly with straight hair, while the textured ones can add wonderful dimension to curly or wavy styles.
When it comes to color selection, think about whether you want your feathers to blend with your natural hair color for subtle dimension, create a bold pop of contrasting color, or complement your typical wardrobe colors. There's no wrong answer here—it's all about your personal style!
Match your feather thickness to your hair type for the most natural look. If you have fine hair, opt for thinner, more delicate feathers. Thicker hair can beautifully support more substantial feathers without them looking disproportionate.
Pattern variety adds another dimension to your style choices. Natural grizzly patterns (those lovely stripes) create interesting dimension, while solid-colored feathers offer a more uniform look. Don't be afraid to mix patterns and solids for depth and visual interest!
If you're feeling creative, consider that natural, undyed feathers tend to accept custom dye better if you want to create your own unique colors—which we'll talk about in the next section.
Tools, Materials & Color Prep
Ready to bring your DIY feather hair extensions to life? Let's gather everything you'll need for this fun, creative project that won't break the bank.
Must-Have Kit Checklist

Think of your feather extension toolkit as your artist's palette – with the right supplies, you'll create something truly beautiful. The essentials include silicone-lined microbeads (these little gems prevent slipping and protect your hair), jewelry pliers with teeth for secure crimping, and a pulling loop tool or fishing line to thread your hair through the beads. Don't forget a fine-tooth comb for precise sectioning and some hair clips to keep everything organized as you work.
Of course, you'll need high-quality feathers – we recommend rooster saddle or hackle feathers for their durability and natural flow. For added flair, you might also want to grab some colored synthetic hair strands to mix with your feathers.
The best part? This entire setup typically costs under $20 – a fraction of what you'd pay at a salon, where just a few extensions can run $50 or more. This makes feather extensions perfect for a crafty afternoon with friends. Gather 5-10 people, split the cost of supplies, and enjoy creating custom looks together! With a little practice, each extension takes about 10 minutes to install, making this a quick and satisfying project.
Preparing Feathers for DIY Feather Hair Extensions
If you've purchased pre-dyed feathers from Moonlight Feather, they're ready to use right out of the package. But if you're feeling creative and want to design your own custom colors, I've got a fantastic method for you.
First, let's clean and degrease your feathers. This step is crucial – natural feathers contain oils that can prevent dye from adhering properly. Fill a bowl with warm water and a few drops of mild dish soap, then gently swish your feathers around for a minute or two. When rinsing, hold the feathers by their stems and use a gentle stream of water. Be careful not to bend them beyond 75° to keep the barbs intact. Gently squeeze out excess water by pinching and running your fingers down the length of each feather.
Now for the fun part – dyeing with Kool-Aid! This method creates vibrant, permanent colors that won't bleed onto your hair. In a microwave-safe dish, combine water (filling about 1/3 of the container), 1-2 packets of Kool-Aid (two packets for brighter colors), and 2-3 tablespoons of white vinegar. The vinegar acts as a mordant, helping the dye bond permanently to the feather's protein structure – similar to how professional hair dye works!
Submerge your feathers completely in this mixture, then microwave on high for about 2-2.5 minutes. Let everything rest for 3 minutes (careful, it'll be hot!), give it a gentle stir, and repeat the microwave cycle once more. For lighter colors, check your feathers every 20 seconds; for deeper shades, you might want to prepare a fresh dye bath and repeat the process. One cool effect: if you're using natural grizzly feathers, they'll maintain their striped pattern, with the dye only affecting the lighter sections.
After dyeing, rinse your feathers under cool running water until the water runs clear. Gently squeeze out excess water and lay them flat on a towel to dry. Once dry, smooth the barbs with your fingers to restore their natural shape.
Want to explore even more creative ways to use your feathers? Check out Creative Uses for Hair Feathers for inspiration beyond hair extensions. And if you're curious about the science behind permanent protein dyes, this research on feather dyeing techniques offers fascinating insights.
How to Install DIY Feather Hair Extensions Like a Pro
Ready to transform your look? Installing your DIY feather hair extensions is surprisingly simple once you know the proper technique. With the right approach, your extensions will look salon-perfect while staying secure and comfortable.
The key to successful installation starts with matching your hair type to the appropriate bead size. This small detail makes a huge difference in comfort and longevity:
| Hair Type | Recommended Bead Size | Number of Feathers Per Bead |
|---|---|---|
| Fine | Small (3mm) | 1-2 |
| Medium | Medium (4mm) | 2-3 |
| Thick | Large (5mm) | 3-4 |
Step-by-Step DIY Feather Hair Extensions Tutorial
Let's break down the installation process into manageable steps that anyone can follow, even if you've never worked with hair extensions before.
Step 1: Choose your placement First impressions matter! Think about whether you want your feathers to make a bold statement or offer subtle peeks of color. Behind the ear creates a lovely accent that shows when you tuck your hair back. Underneath layers gives that magical "now you see it, now you don't" effect. Along the hairline frames your face beautifully, while scattered placements throughout create dimension and movement. Hold your feathers up against different sections to see what speaks to you.
Step 2: Section and prepare the hair Precision is your friend here. Use your fine-tooth comb to create a clean, sharp part exactly where you want your extension. The section of hair should be about pencil-width – too much hair will feel heavy and uncomfortable, while too little won't secure properly. Keep surrounding hair clipped away to give yourself a clear workspace.
Step 3: Thread the hair through the bead This step might feel tricky at first, but you'll get the hang of it quickly! Thread your silicone-lined microbead onto your looping tool, then create a small loop with the tool. Catch your sectioned hair in this loop and pull it through the bead. The magic happens when you slide the bead up to about 1/4 inch from your scalp – not flush against it, which can cause discomfort.
Step 4: Insert the feathers Now for the fun part! Gather your chosen feathers with the stems neatly aligned. Slip these stems into the bead alongside your hair, making sure they extend through by at least 1/8 inch. For a fuller, more dramatic effect, use 2-3 feathers per bead – just make sure not to overcrowd based on your hair type and bead size.

Step 5: Secure the bead Grab your jewelry pliers and position the bead flat against your head, parallel to the scalp. With one smooth, confident motion, crimp that bead closed. For extra security, crimp from multiple angles until the bead is completely flattened. Give the feathers a gentle tug – if they're secure, you're good to go!
Step 6: Style and blend Release your clipped sections and let your hair fall naturally. The feathers will blend right in, creating that effortless, bohemian vibe. If you prefer a more subtle look, position your extensions so they're partially hidden under top layers, creating beautiful surprises when you move.
When installing multiple extensions, keep them at least 1/2 inch apart. This prevents tangling and ensures each extension has room to move naturally with your hair.
Attaching DIY Feather Hair Extensions with Micro Link Beads
Micro link beads (also called micro rings or crimp beads) are the secret weapon of professional stylists, and now they're yours to use at home. These tiny but mighty tools offer several impressive benefits:
They're gentle on your hair. The silicone lining inside quality beads creates a protective cushion that prevents damage to your hair shaft – no breakage, no stress.
They hold like nobody's business. When properly crimped, these beads create a secure grip that keeps your feathers in place through washing, styling, and even swimming (with proper care).
They sit comfortably against your scalp. The flattened profile means no poking, no irritation – just forget-they're-there comfort.
They're reusable. Unlike some attachment methods, you can uncrimp and reposition these beads multiple times, making them economical and versatile.
Choosing the right beads makes all the difference. For a truly invisible installation, match the bead color to your hair color. Fine-haired friends should stick with smaller 3mm beads, while those blessed with thicker locks can comfortably use 4mm or 5mm beads to accommodate more feathers.
The silicone lining isn't just a nice-to-have – it's essential. Metal-only beads can cause friction and breakage, so always check that your beads have that protective inner layer.
If you experience any slipping, double-check that you've crimped the bead completely flat from multiple angles. For maximum comfort, sweet spot – position the bead 1/4 inch from the scalp, not directly against it. And for the most flattering look, flatten the bead parallel to your scalp so it virtually disappears.
With these professional techniques, your DIY feather hair extensions will stay securely in place for 4-6 weeks while moving naturally with your hair. The best part? No one will guess you did them yourself – unless you decide to show off your new skills!
Maintenance, Styling & Safe Removal
The beauty of DIY feather hair extensions lies in their incredible versatility. Think of them as natural additions to your hair that move, flow, and can be styled right alongside your regular locks. With a little care, these feathery accents will stay gorgeous for weeks.
Your morning routine won't need much adjustment when you're rocking feather extensions. Simply brush around the attachment point with gentle strokes, being careful not to tug directly on the bead. When washing, your regular sulfate-free shampoo works perfectly fine—just avoid massaging conditioner right onto the bead area, as this slippery substance might cause the extensions to slide out prematurely. After your shower, pat your hair dry instead of aggressive rubbing, which helps preserve both your extensions and your natural hair.
One of my favorite things about feather extensions? They can handle the heat! Your curling iron, straightener, and blow dryer (up to 400°F) work beautifully on these natural accessories. I always recommend using a heat protectant spray on both your hair and the feathers before styling. The first time you apply heat, test a small section to make sure your particular feathers respond well—some feathers actually take on gorgeous new textures when heat-styled!

Before bed, take a minute to loosely braid your hair—this prevents overnight tangling and keeps your extensions looking fresh longer. A silk pillowcase works wonders by reducing friction while you sleep. And always dry your extensions before bedtime, as damp feathers can mat together overnight.
Active lifestyles and feather extensions mix perfectly well together! For swimming or intense workouts, secure your hair in a braid or ponytail. After taking a dip in chlorinated pools or salt water, give your hair a thorough rinse with fresh water and apply a light leave-in conditioner to restore moisture to the feathers. With this simple care routine, your DIY feather hair extensions can beautifully adorn your hair for 4-6 weeks before needing removal or repositioning.
Removing DIY Feather Hair Extensions Safely
When it's time for a change or your natural hair growth has pushed the extensions too far from the scalp, removing them properly ensures both your hair and the feathers stay in perfect condition for future use.
Start by parting your hair to clearly expose the flattened bead. A fine-tooth comb helps separate surrounding hair, giving you clear access to the attachment point. Next, position your jewelry pliers perpendicular to how you originally crimped the bead—this is crucial for easy opening. With gentle pressure, squeeze to reopen the bead. If it seems stubborn, try approaching from different angles until you feel it loosen.
Once the bead opens up, simply slide it down and off your hair strand. Carefully remove the feathers, keeping them together if you plan to reinstall them later. Take a moment to check that no hair strands remain wrapped around the feather stems, which could cause breakage when pulled apart.
Your removed feathers deserve proper care too! Gently wash them in mild soapy water if they need refreshing, rinse thoroughly, and lay flat to dry completely. Store dry feathers in an envelope or plastic bag until inspiration strikes for your next style change.
For those occasional stubborn beads that refuse to budge, a tiny drop of argan oil around the bead can work wonders to help it slide more easily. Whatever you do, never force or cut the bead—your precious hair strands deserve gentle treatment! With proper removal techniques, you'll experience zero breakage, and your feathers will be ready to reinstall whenever you're ready for your next boho-chic moment.
Looking for more styling inspiration? Check out our guide to Hair Feathers: The Must-Have Trend for Summer for seasonal ideas that will keep your look fresh year-round!
Troubleshooting, Creative Uses & Sustainability
Let's face it – even the most carefully installed DIY feather hair extensions might need a little troubleshooting now and then. But don't worry! Most issues have simple solutions that will have your feathery style back on track in no time.
If your beads are slipping, it's usually because they weren't crimped tightly enough or you used too much hair in the section. The fix is straightforward – simply remove and reinstall with a more firmly crimped bead and a smaller section of hair. Those visible beads ruining your vibe? Try positioning them under a top layer of hair or choosing beads that better match your hair color for a more seamless look.
Has your vibrant blue turned into a sad sky color? Feather fading typically happens with excessive washing or sun exposure. Switch to a color-safe shampoo and consider refreshing custom-dyed feathers using our Kool-Aid method when needed. Your scalp feeling uncomfortable? The bead might be too close to your roots – reposition it about 1/4 inch from the scalp for instant relief.
And if you're experiencing any itching or irritation, it could be a sensitivity to the feathers or dyes. In this case, it's best to remove the extensions immediately and perhaps try synthetic alternatives instead.
The beauty of feather extensions goes way beyond basic installation. Our customers have shown incredible creativity with their feathery looks! Try incorporating your extensions into braids for that perfect bohemian vibe, or attach feathers to bobby pins or barrettes when you want a one-day wonder without commitment. Festival season? Create clusters of colorful feathers that'll have everyone asking where you got them done. For a truly eye-catching effect, install feathers at different lengths to create a gorgeous cascading waterfall of color.

At Moonlight Feather, we're passionate about sustainable and ethical practices. We believe that looking good shouldn't come at the expense of our planet. Properly removed feathers can be reused 3-5 times, dramatically extending their lifespan. When your extensions have finally seen their last styling, transform them into earrings, dreamcatchers, or other crafts instead of tossing them out.
Want to make your feather trip even more eco-friendly? Host a feather extension party where friends can share materials and techniques – it's not only sustainable but also twice the fun! And of course, always choose ethically sourced feathers from suppliers (like us!) who prioritize humane and sustainable sourcing.
Frequently Asked Questions about DIY Feather Hair Extensions
How long do DIY feather hair extensions last?
With proper installation and care, your DIY feather hair extensions will typically stay gorgeous for 4-6 weeks. It's usually your natural hair growth that determines when it's time for a change, as the attachment point gradually moves further from the scalp. Once the bead has grown out about 1/2 inch, you'll want to reposition or remove the extension.
The feathers themselves are surprisingly durable – with gentle handling, the same feathers can be reused for 3-5 installations before showing significant wear. Talk about getting your money's worth!
Can I swim or work out with them installed?
Absolutely! One of the joys of feather extensions is their durability during everyday activities. Swimming and working out are totally fine, though a few simple precautions will keep your feathers looking their best.
Before diving in, braid or secure your hair to prevent tangling. After swimming in chlorinated pools or salt water, give your hair a good rinse with fresh water. A light leave-in conditioner applied to feathers afterward will keep them soft and beautiful. Just be mindful that extreme heat and humidity (like hot tubs or saunas) might affect some dyed feathers.
As for workouts, sweat away! Just avoid hairstyles that put direct tension on the beads, like tight ponytails positioned right over an attachment point.
Will heat tools damage the feathers?
Your styling routine doesn't need to change with DIY feather hair extensions. Quality feathers can handle heat styling up to approximately 400°F, which covers most curling irons, flat irons, and blow dryers. The protein structure of feathers is remarkably similar to hair, allowing them to be styled right alongside your natural locks.
For best results, treat your feathers like you would treat your best hair – use a heat protectant spray, start with lower heat settings, and keep the styling tool moving rather than holding it in one spot. If you're trying a new styling technique or particularly high heat, test on a small, less visible feather first.
Some very delicate or heavily processed feathers might be more heat-sensitive than others, so a quick test can save you from any styling mishaps and keep your feathery style looking fabulous for weeks to come.
Conclusion
Creating your own DIY feather hair extensions is a journey that rewards you with both style and savings. There's something magical about changing simple feathers into beautiful hair accessories that express your unique personality – all while keeping more money in your wallet than salon services would allow.
At Moonlight Feather, we've seen countless customers transform from nervous beginners to confident feather artists with just a little practice and the right supplies. Our ethically sourced feathers provide the perfect foundation for your hair art, whether you prefer natural grizzly hackles or vibrant custom-dyed options that make a statement.
Let's take a moment to revisit the simple process that creates such stunning results:
First, select feathers that complement your hair color and desired look. Then gather your tools – those silicone-lined microbeads and jewelry pliers make all the difference in creating secure, comfortable extensions. When you're ready to install, section your hair with care, thread it through the bead using your loop tool, and insert your chosen feathers before crimping the bead securely.
The beauty of DIY feather hair extensions is that once installed, they become part of your hair's natural movement. Wash them, curl them, straighten them, or braid them – they'll move with you through your daily styling routine. And when you're ready for a change? Simply uncrimp the bead and either remove or reposition your feathers for a fresh look.
We love seeing how creative our customers get with their extensions. Some create subtle natural accents that peek out with each head turn, while others accept bold festival-ready statements that capture attention from across the room. Your extensions can be as unique as you are, with endless possibilities for placement, color combinations, and styling techniques.
The feathers you choose today might become earrings tomorrow, or perhaps they'll find new life in a dreamcatcher next month. This versatility and reusability make DIY feather hair extensions not just a fashion choice, but a sustainable one too.
We can't wait to see what you create with your Moonlight Feather supplies! Tag us in your social media posts to share your beautiful creations with our worldwide community of feather enthusiasts. Your next hair change is just a few feathers away!